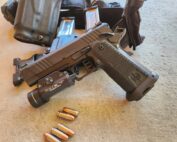

AC0114_READY_Lead_Pic
What We Have Here Is A Failure To Differentiate.
There’s been a lot of hoopla about a ready position called the “high compressed ready.” It’s all the rage, looks sorta tactical and all the cool kids are doing it. It also presents some real advantages on the range and in competition. But it’s dangerous for the street and dangerous to practice too much if you carry a handgun for serious purposes.
Before we dive into the high compressed ready and its pros and cons, let’s set some context. There’s a difference (albeit with some overlap) between a ready position and a challenge posture. A ready position refers to how you hold your gun when it’s out of the holster on the range, usually when you are prepared to take a shot soon. A challenge posture refers to how you hold the gun when you have drawn the gun on a live person, in the real world, and are giving them orders (“Stop! Don’t move!”).
Many shooters — and truth be told, many “instructors” — don’t understand the difference between them and as a result wind up using a ready position as a challenge posture. Naturally, ready positions may be wildly inappropriate or even dangerous as challenge postures. Even if a shooter hasn’t made a conscious choice to use a ready position as a challenge posture, they’ll be strongly predisposed to employ their most-practiced ready position when a real-world challenge situation arises.
And the high compressed ready is indeed a wildly inappropriate and dangerous challenge posture.
There are dozens of reasonable ways to hold your gun when it’s out of the holster, both at the ready and to challenge, but most are variations of two basic positions. Let’s examine each from the perspective of both a ready position and a challenge posture. All of the following assumes you are standing upright and your target or adversary is in front of you: I know that’s a big assumption in the real world.

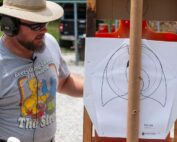
Left: Traditional low ready / Right: Relaxed low read
Left: Retracted low ready / Right: High ready
Low Ready Ideas
The traditional low ready is shown in Photo 1. The arms are extended and the gun is held depressed, pointing at the ground. This is the traditionally taught ready position, and it’s a good one. The gun is pointed in a safe direction and can be quickly raised onto target. How quickly? My own experiments with a S&W M&P from 8 yards using an 8.5×11″ piece of paper as a target yielded the following times from the buzzer to the first shot: Finger on-trigger, gun pointed at target: .25 seconds; finger off-trigger (Safety Rule 3), gun pointed at the target: .35 seconds; finger off-trigger (Rule 3), gun at low ready pointing at the base of the target stand (Rule 2): .35 seconds.
Others have run this experiment with similar results. Essentially, you give up 1/10 of a second by keeping your finger off the trigger until you want the gun to fire (which everyone agrees you should do — that’s Rule 3). And in that same 1/10 of a second you can raise the gun from a low ready to the target (thus adhering to Rule 2). So assuming you want to adhere to Rule 3 (and you’ll have some explaining to do if you don’t in the real world), you give up no time by keeping the gun in a low ready position compared to starting with the gun raised and on target. By the way, how fast is 1/10 of a second? For comparison, an eye blink is about 1/3 of a second.
This same analysis makes the low ready an excellent challenge posture. It allows you to see your opponent’s hands clearly (which pointing the gun right at him may not allow), and it adheres to Rule 2 (Don’t let the muzzle cover anything you are not willing to shoot at that moment). Adhering to Rule 2 in a real-life challenge situation is critical. You can be bumped, you can slip, fall, be startled, or you may need to quickly do something else with your off-hand. All of these things can easily cause a sympathetic contraction of the fingers of your dominant hand, and cause the gun to (truly, accidently) discharge.
No matter how good or well trained you think you are, no matter how much testosterone you have, this can happen — and does on a regular basis every year. Using the low ready as a challenge posture costs you nothing; it’s not slower than challenging by pointing the gun at the bad guy, which is an amateur mistake we still see all too often.
The main problem with the traditional low ready, both as a ready position and a challenge posture, is it can be difficult to hold for long periods of time. At close quarters, it may also put your gun too close to your adversary. Likewise, during a search, it may not allow you to move about easily in close quarters. In those cases the relaxed low ready (Photo 2) or the retracted low ready (Photo 3) solve the problem, and most thinking people perform them intuitively.
I use the clinically accurate adjective “retracted” rather than “compressed” because “compressed” sounds too wannabe-like to me. Likewise, I don’t refer to shooters as “operators.” These terms are reserved for actual military special operations personnel — or for spies (where the term originated) during the 1950s and ’60s.

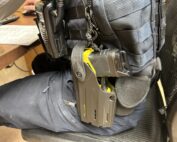
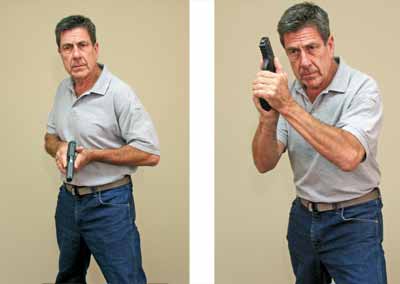
High compressed ready
High Ready Ideas
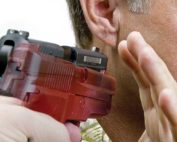
The traditional high ready, AKA the Sabrina (you remember Sabrina, Kate Jackson’s character from Charlie’s Angels?), is shown in Photo 4. This is not a ready position allowed at most ranges. In the real world it’s also usually more likely to have the muzzle pointed at something you don’t want to shoot, as opposed to the safer low ready. As a challenge posture, the muzzle is disturbingly close to your face. Should you slip, get bumped, be startled, etc., things could get, um … startling.
On the plus side, it’s faster than the low ready since the front sight can already be in line with your target. The gun is close to you, so it’s appropriate for close quarters. Also, it can be a safer position for a middle-of-the-stack tactical team member to assume while in the stack than a low ready, which may point his gun at the team member in front of him.
The retracted high ready (AKA the high compressed ready) is shown in Photo 5. For some reason I haven’t figured out, all the internet experts say your butt has to stick out in order to perform the high compressed ready properly, which I’m not doing anywhere near enough in the photo. It’s perhaps the fastest ready position in terms of shot-on-target.
On the range, the gun is pointed in a safe direction. However, on the street, the gun is pointed right at your adversary, and they are — at least, at the moment — still an innocent person. Shoot them accidently and the ruination of your life may begin. This is what scares me when I see this technique taught as a general-purpose, gun parking spot when out of the holster. A lot of the no-experience-off-the-range “instructors” seem to be teaching this these days.
To be clear, I have absolutely nothing against firearms instructors with no LE or military experience teaching gun skills. I do, however, find they sometimes uncritically promulgate range-only skills as legitimate real-world skills and is something to keep in mind if you’re attending a class taught by one.
A relaxed high ready is shown in Photo 6. It’s nothing more than the relaxed low ready held at the sternum rather than the abdomen. This technique is suitable both as a ready position and as a close-quarter challenge posture.
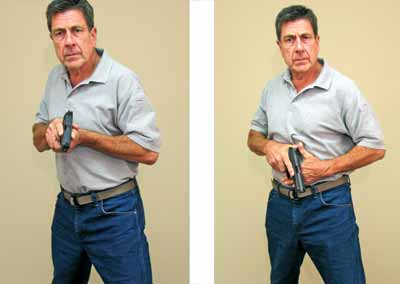
Left: Relaxed high ready / Right: SUL position
Position SUL
The SUL position (Photo 7), is a highly stylized version of the retracted low ready, and was never intended as a ready position to begin with. Alan Brosnan and Max Joseph developed it as a safe movement position for some Brazilian officers with very poor muzzle control, whom they were teaching. It works well in this application because it must be deliberately acquired and provides tactile feedback you are in the correct position. It’s generally more suitable to a gun-out movement than it is as a ready position, and it’s also slower to first shot than most other positions.
Of course, because it does look so taticool and stylized, it wasn’t long before it became the very word of God and taught as the one correct way by many “instructors.” We should note it does have application as a sort of combined ready and movement position when working in a 360-degree range or in a tube environment (bus, airliner cabin, etc.). On the other hand, almost anyone with much experience will naturally have good muzzle control with an intuitive retracted low ready (Photo 3) in these environments anyway.
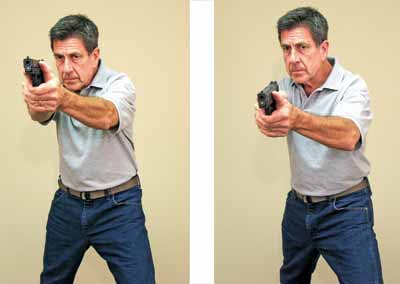
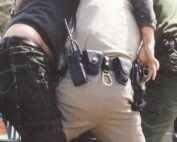
Left: Gun on-target at suspect / Right: Low ready
What To Use?
As a default challenge: the low ready. When the low ready is too extended to be safe or practical as a challenge posture, the relaxed low ready, the retracted low ready or retracted high ready works fine. In special circumstances only, you might find a use for the high ready.
For shooting competitions where you need to squeak every 1/100 of a second off your time, use the retracted high ready (the high compressed ready). If you doubt your muzzle control, use SUL for very tight movement around innocents.
One Last Thought
One argument against challenging with a low ready rather than simply pointing the gun at the suspect is the gun pointed at him is “more intimidating.” I think this argument comes from weak verbalization and command skills. Look at Photos 8 and 9 and imagine loud, firm commands being given. Is there really a difference in the intimidation factor? And how much can you rely on an intimidation factor in the real world, anyway? Remember how the “Shock and Awe” tactic didn’t work in Iraq?